Mod Edit (22/11/21): It appears some of the files contained in solkap’s superb and helpful step-by-step guide below no longer function - meaning the project is currently unavailable via this guide. Unfortunately solkap is no longer around the site too - so the broken or missing links / files cannot be updated or fixed.
Another kind member on here has been helping out with requests for this project. Read through this project thread - and from around Page 20 onwards you’ll see him going out of his way, above and beyond, in helping fellow members.
Personally, it’d be great to see some of the people posting requests for projects to have already made 15-20 decent quality posts on here (and also having read the site’s Fan Project Rules)… before being able to receive projects. Though that’s just me. (Bah, humbug!)
^ Just simple things like helping out others on here, leaving feedback or reviews, or even joining in with conversations in the discussion topics around the site… whether that is talking about the Original Trilogy, Star Wars in general, Fan Projects, or in ‘Off Topic’ etc… maybe some becoming members of this community even after making those initial 15-20 decent quality posts?
(1/4/19) Update: Recently there have been several of the links I’ve been sharing that have inexplicably died. I have re-uploaded the files to fix the problem. However, this means they have new links, so I have also had to update the link list, and that old copies of the list will have broken links. I hope this does not continue to be an issue. However, I will keep a running log of the last three characters of the old and new links here, so you can check if your info is up to date. If your info is not current, simply re-download a fresh copy of the list using all the same steps below. And if you run into a link that fails with a “Temporary Error” message, and you aren’t over your mega data limit, please post in this thread so I can address the issue. Sorry for the inconvenience.
That said, if this is your first time downloading the NJVC Custom Blu-ray Set, this update will only concern you if you run into new dead links. Otherwise, you may disregard this update as you follow the steps below.
Great news! I got the OK from NJVC to share his sets on mega again! Harmy has given his approval as well.
More great news! With help from another member, I have also obtained the alternate version of this set that uses ten BD-R 25 discs instead of four BD-R 50s and two BD-R 25s. And I have the green light from both Harmy and NJVC to share these variants as well!
The content of this version of the set is almost exactly the same as the one I have already been sharing here for several months. It merely divides the material of the larger discs between two smaller ones and has a few less audio options. Since I am now sharing all the versions available, and there will be several instances where you will have different choices for how you would prefer your content be divided, I am including the chart below to hopefully help make the options a little clearer.
This image is just here as a preview. Click the link beneath it for the full size graph.
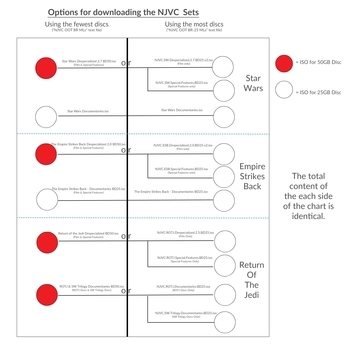
NJVC Set Download Options Chart
Also, just so you know, downloading a given disc does not mean you must continue with only discs in that version. These are just choices to mix and match how ever you would like.
If you would like more information on these sets and previews of them, go to the NJVC Custom Bluray Set thread.
But as with anything else Despecialized, these projects should never be bought or sold.
You are also required to own an own official copies of the Blu-rays or the HD Digital Downloads of Episodes IV, V, and VI before you download anything.
These requirements are to allay concerns of piracy, which could threaten the entire Despecilaized Project. So before you download anything here, please obtain official copies of the Original Trilogy in HD. And please … please … DO NOT BUY OR SELL THESE!
I have built in a few barriers I will ask you to deal with before you can get the files to burn the blu-rays. This is not meant to keep anyone who wants copies for personal use from gaining access. Rather, it is meant to ensure that you must be intentional about getting them. I regret that this has to be so convoluted. My aim was to make NJVC’s sets as available as possible, but still make it inconvenient enough to keep my shares from being pirate bait. Follow the steps, be patient, and you will obtain the files you seek, and all without torrents. 😃
I also have a guide to burning these sets posted here below in the most comprehensive way I could think of. Mods, if you spot something anywhere in this guide that I could improve, please let me know.
Steps for obtaining NJVC Sets…
1) If you do not already have a proboards.com account, go to https://login.proboards.com/register/6838057 and set one up.
(^Note^- Make sure to try manually typing or deleting at least one character when entering your chosen password instead of only copying and pasting the whole thing. The web-form sometimes does not recognize that text has been entered if none of it was entered by hand.)
2) Now go to http://swesbrotjbrmls.freeforums.net/. Your proboard credentials should allow you access.
(^Note^- Just so you know, the letters in that link aren’t nonsense. It’s an acronym for “Star Wars Empire Strikes Back Return Of The Jedi Blu-Ray Mega LinkS”.)
3) Open the “General Discussion” Folder
4) Click the “NJVC” Subject. This will contain two links.
One will say “BD-R 50/25 rars”.
The other will say “BD-R 25 only rars”.
Using the chart above, you can decide whether you want the information for one version or the other, or both if you want to obtain a custom combination of discs from both sides.
5) Those links will each direct to a download link for a password protected rar file.
For the “BD-R 50/25 rars” option, the file will be called “NJVC OOT BR MLs”.
For the “BD-R 25 only rars” option, the file will be called “NJVC OOT BR-25 MLs”.
The download page for either will probably say “Whoops! There was a problem with the preview.” This is merely because the files are password protected. You will use the password I will give you in the next step to extract either of the files you have chosen.
6) Download and extract either file with the password “Speci@lEditionsAre2ShortSighted”. The extracted package will contain a single text file called either “NJVC OOT BR MLs” or “NJVC OOT BR-25 MLs”.
(^Note^- Here is a helpful article on how to extract archived files in Windows and Mac OS. If you do not already have a file extracting program, I used winrar to archive the file, but there are also many other programs that can unrar it for free. Here’s a list of several such programs for windows. The Unarchiver should work for Macs.)
7) This text file will contain links to either a single mega folder or two mega folders for each disc. (Those with two folders are only like this because new space limits on mega have necessitated my use of multiple accounts. You will need to save all the files from a particular group in the same folder on your computer.)
The folder links are only provided in case you would like to import them to your own mega.nz account before downloading. It’s not feasible to download the entire folder all at once without a premium account.
For your actual download, you will need to use the lists of links beneath the “File Links” Headings. These are download links to all the necessary rar files. Each of these rar files is a piece of the finished ISO disc image, which has been spliced into smaller pieces for the purpose of making them more transferable. You will need to finish downloading all the rars in a given group before you can extract anything, since any of the rars in a given section are only part of the finished file.
All these links are in free accounts, and unless you have a paid account, mega.nz will impose a 5GB download limit every six hours. You should also be aware that the files in the sections with two folders are in bigger pieces.
That means you’ll probably only be able to download a maximum of:
(10) 500MB rar files from a section with one folder
or
(5) 953.7MB rar files from a section with two folders
before getting a messages telling you to wait several hours before continuing to download if you are downloading through a browser or getting an error message in a download manager program. Also, if there is ever a “rush” on these files that slows them down because of bandwidth demands, there isn’t anything I can do.
8) For this reason, I recommend using the download manager “FreeRapid Downloader”. It will let you download several files at once, as well as saving your progress if the process is aborted midway through with the wait message. You can get that at this link: FreeRapid Downloader. But you will still likely be limited to 10 or 5 rar files every six hours or so. Remember, patience is key.
For more details on using FreeRapid Downloader, check out Section 4, Steps 1-6 of “The Ultimate Introductory Guide to Harmy’s Star Wars Trilogy Despecialized Editions”, found here.
(^Note^- Though I recommend step 8 in helping to shorten a very lengthy process, it is optional. If you run into a few rars with errors or that are downloading especially slowly in FRD, try loading just those in a browser and see if you can download them manually.)
9) Once you have all the rar files from a set downloaded into a single folder, extract them with your chosen unarchiving software. Do this by opening your chosen program, selecting the the directory in which you want the finished ISO to save, selecting part 1 of the rar set, and then starting the extraction process. Your computer will recognize that it is part of a set and automatically extract all the rars. It will also reassemble them into the finished ISO file and save that to whatever location you choose.
(^Note^- Depending on your extractor and its settings, you will likely need to have free disk space for the rars as well as space in which the ISO files can be reassembled and saved. And these files are massive. The space required for all the rars plus the extracted ISOs for all three films is close to 450 gigabytes. Make sure you have the disk space necessary before you start. Also, although you will be using the same extraction method as used for extracting the link list, it will be much slower because of the size of the files. Make sure to allow about 30 minutes to an hour for the extraction of each set of rars.)
10) Once the extraction process is complete for each of the rar sets, you will have several ISO Files.
Using the all the links from the “NJVC OOT BR MLs” option will result in the following six ISO files:
Star Wars Despecialized 2.7 BD50.iso
Star Wars Documentaries.iso
The Empire Strikes Back Despecialized 2.0 BD50.iso
The Empire Strikes Back - Documentaries BD25.iso
Return of the Jedi Despecialized BD50.iso
ROTJ & SW Trilogy Documentaries BD50.iso
Using the all the links from the “NJVC OOT BR-25 MLs” option will result in the following ten ISO files:
NJVC.SW.Despecialized.2.7.BD25.v2.iso
NJVC.SW.Special.Features.BD25.iso
Star Wars Documentaries.iso
NJVC.ESB.Despecialized.2.0.BD25.v2.iso
NJVC.ESB.Special.Features.BD25.iso
The Empire Strikes Back - Documentaries BD25.iso
NJVC.ROTJ.Despecialized.2.5.BD25.iso
NJVC.ROTJ.Special.Features.BD25.iso
NJVC.ROTJ.Documentaries.BD25.iso
NJVC.SW.Trilogy.Documentaries.BD25.iso
(^Note^- ISO files are the digital images of the videos and file structures to be burned to the blu-ray disc, but it is not necessary to burn the ISOs to discs to view them. You can mount the file as a virtual drive to have your computer view the file as if it were a disc in a drive. Here is an article on how to do that in Windows. The process is even simpler in Mac OS. If you still want to burn them to discs, read on.)
11) If you have downloaded the version with six ISOs, you’ll need discs of the following sizes for them:
| ISO Label |
Disc Size required |
| Star Wars Despecialized 2.7 BD50.iso |
BD-R DL 50GB |
| Star Wars Documentaries.iso |
BD-R 25GB |
| The Empire Strikes Back Despecialized 2.0 BD50.iso |
BD-R DL 50GB |
| The Empire Strikes Back - Documentaries BD25.iso |
BD-R 25GB |
| Return of the Jedi Despecialized BD50.iso |
BD-R DL 50GB |
| ROTJ & SW Trilogy Documentaries BD50.iso |
BD-R DL 50GB |
If you have downloaded the version with ten ISOs, you will simply need ten BD-R 25GB discs.
12) Obtain a blu-ray burner drive.
13) Now that you have the necessary ISOs, blu-ray discs, and blu-ray burning drive you’ll need disc burning software. For this, the best method is to use ImgBurn. It is a versatile free disc burning program, but the official current version (2.5.8.0) now comes loaded with extra unwanted software. In hopes to help you avoid headaches that might cause, I’m providing a clean link to ImgBurn 2.5.8.0 here: goo.gl/dSPTGG. ImgBurn doesn’t have a Mac version, so if you use a Mac, this list of ISO burners may be helpful. I have heard good things about Roxio Toast and one that is not on that list: ISO Burn Plus. Neither RT or ISO BP is free though, and since I don’t use Macs myself, and can’t speak from personal experience, I won’t be providing direct links to those programs. If you have a Mac, I’m sorry I cannot be more helpful, but I can say with confidence that ISO burning is possible with one, and that the steps should be similar to the steps for ImgBurn pictured below.
14) Connect your drive and load the blank disc.
15) You’re ready burn the ISOs to your blu-ray! Follow the steps below.
Steps for burning NJVC Sets…
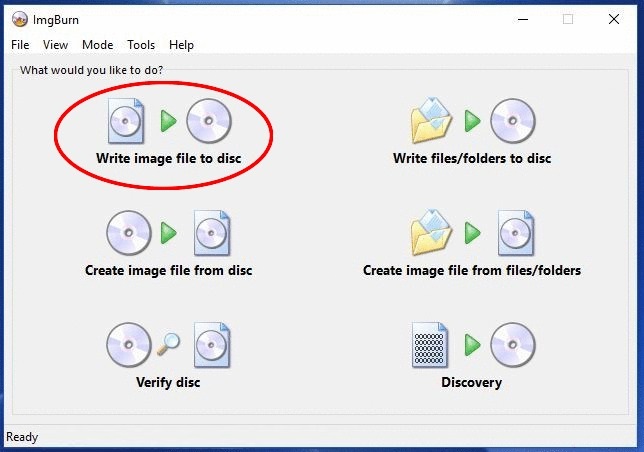
- Open ImgBurn and select “Write image file to disc”.
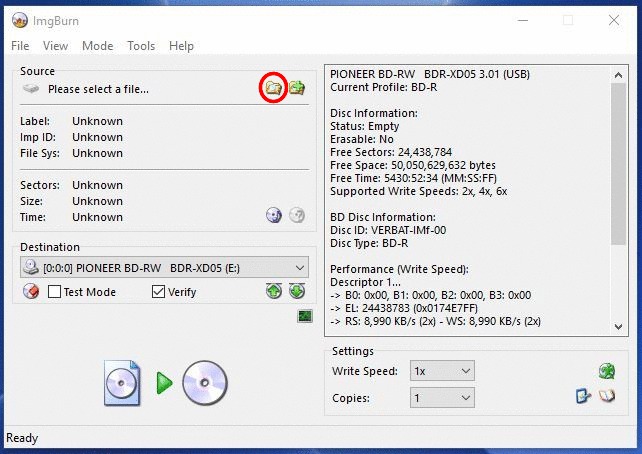
- Next, Under “Source” use The “Browse for a file…” button to navigate to the ISO you want to burn and select it.
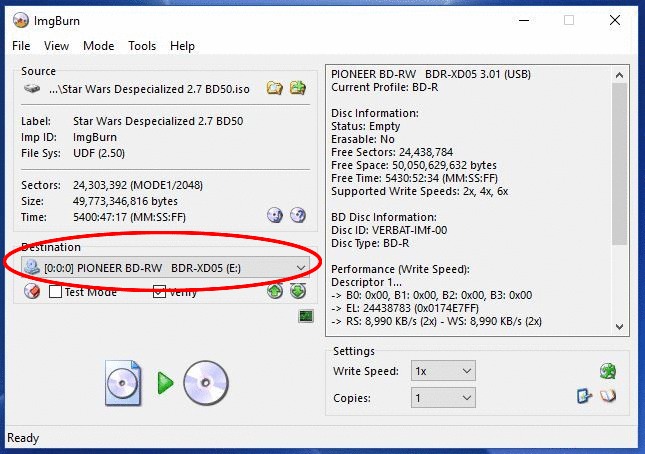
- Under “Destination”, select the blu-ray drive that you will be using to burn the disc.
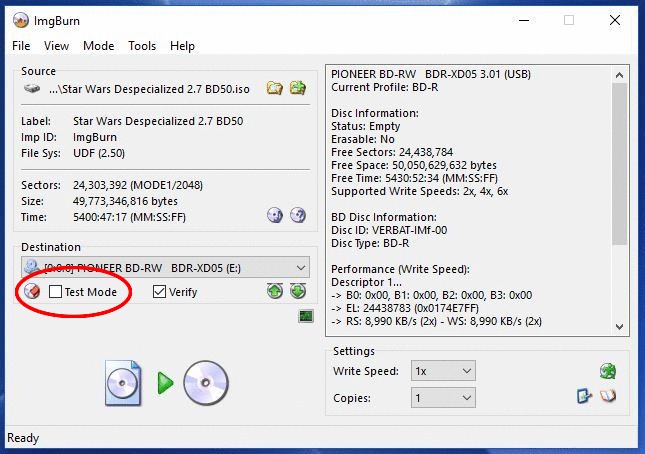
- Make sure the box next to “Test Mode” is unchecked.
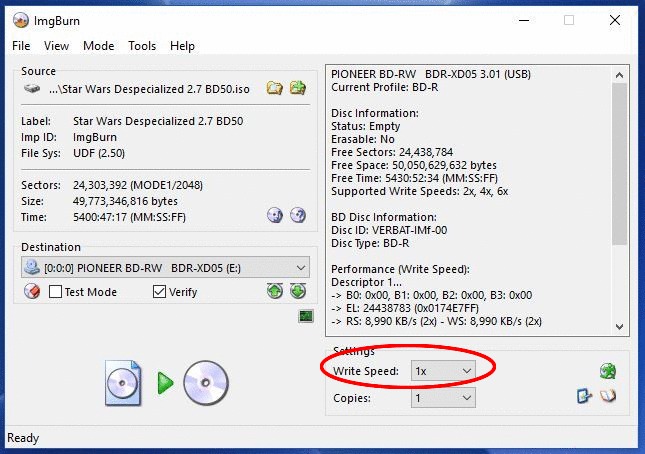
5)* This step is optional, but I strongly recommend it. Set the “Write Speed” to the lowest possible setting. This will mean the initial burn will probably take over an hour, but reducing the burn speed means reducing the chances of burning errors.
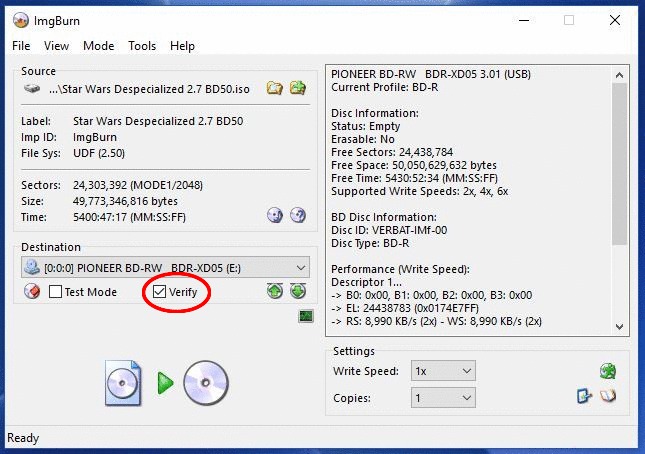
6)* This step is also optional, but I recommend it as well. Make sure the box next to “Verify” is checked. This will cause the system to scan the disc for errors after the burn is complete. This will add another hour or so onto processing time, but it is a double check so you can be sure the disc has burned properly without any errors.
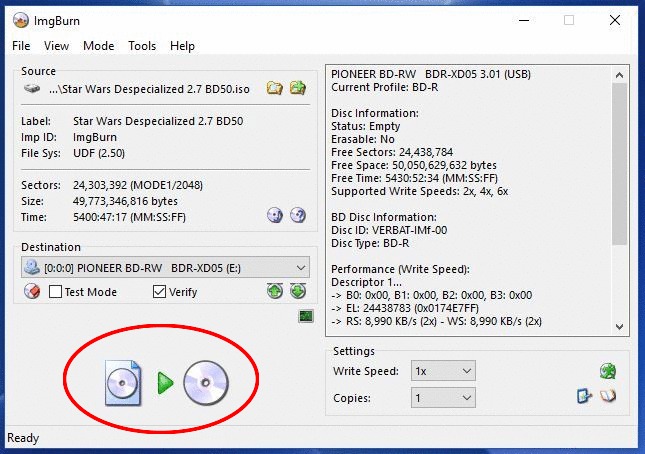
- Click the “Write” button to begin the burning process.
8)* After the initial burn is complete, the disc will eject. If you selected “Verify” in step 6, the computer will attempt to reload the disc to scan it for errors. Motorized trays will allow the computer to do this automatically, but non-motorized drives will not be capable of this. The result will be the following warning message:
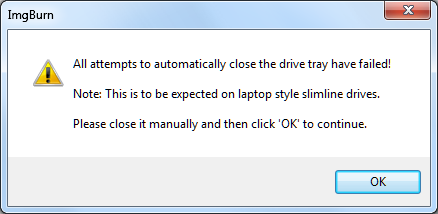
This is normal. Reload the disc again manually, then click “OK” as the prompt directs. ImgBurn will scan your disc for errors, probably taking about an hour. When it finds none, it will eject the disc again, announce that the burn has been successful, and you’re done!


