logo Sign In

poita

User Group
Members
Join date
11-Sep-2012
Last activity
23-Jun-2025
Posts
2,164

Post History

Post
#1014645
Topic
Single Pass Regrade of Grindhouse ESB (Released)
Time

It is an interesting look, but I really think you need to check your monitor calibration.
In your example, the cave is now green hued

and Luke’s face looks like an Oompa Loompa

The Yoda shot is also crazy green, right down to the shadows.

I’m not sure re the Grindhouse, but I think they adjusted the colour all over the place to what they liked, which is fine, but I’d say that a few scenes where done independently which would make a single pass fix difficult.

Post
#1014643
Topic
Info: The Ultimate Super Resolution Technique
Time

Okay, here goes. I didn’t spend much time on this, so far better results are possible, I didn’t have time to work out the best alignment points and settings, and these are from Tech prints, so there are some RGB alignment issues in the source. I also used raw scans, so the damage and dirt is still there, it would be better had they been cleaned up first.

I found a scene I have a few scans of. The scans are all in 1080P.

I loaded the scans into elastix to roughly align them, then exported to autostakkert to stack and drizzle the images.

The source frame was this. (right click to view at full 1080P)

After a (very rough) stacking, we get this result at 1080P

You can see most of the noise has disappeared and more detail revealed in the trooper and in the sand patterns behind him.

So to compare a before and after stacking with a close-up of our favourite trooper, see if you can work out which is the before and which is the after…

Some Split-screen compares: (right click and view the image to see them at full Rez)

The next step is to enable drizzling to try and get a super-resolution thing happening. This normally would mean a lot of experimenting to find the best settings, these were just a first guess, it could be made better.
So to scale our original frames to a stacked and super-rezzed 4K image (4096 pixels wide vs 1920 pixels wide) we get this:

The image on the left is the drizzled ‘super resolution’ image, on the right, is the original frame upscaled to the same size in Photoshop’

Finally, a full 4096 pixel wide image created via stacking and drizzling the 1080P source scans:

https://infinit.io/_/b52Jcxw

Unfortunately IMGUR reduces the image quality quite a bit, so I have linked to the file instead.

Anyway, I have probably bored everyone shitless now, even though that is a quick example, not a great one by any means, but I thought I’d share the kind of thing I’ve been messing with. As I mentioned, I’ve been doing it with astrophotography for many years, and those programs and techniques can be quite useful for image processing in general.

Post
#1014630
Topic
Info: The Ultimate Super Resolution Technique
Time

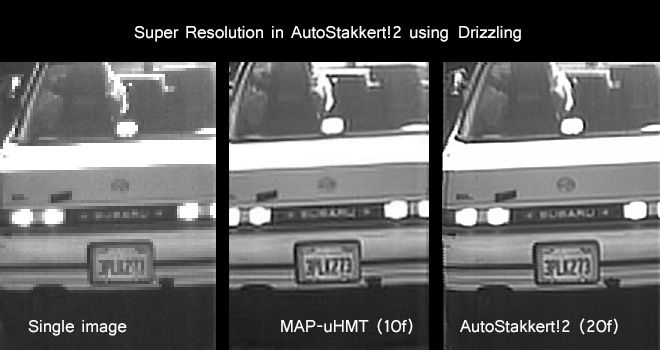
We routinely stack thousands of images when doing astrophotography, to reduce the noise, and increase the resolution, it works well and the process is well documented and easy to implement.

Some examples with autostakkert here of getting extra resolution, this time using 20 frames of security camera footage instead of astro-images:

Also for imaging with cheap gear, such as using a webcam to image Jupiter and stacking a few thousand images to get the detail in and the noise out.

Webcam Footage
webcam footage

Stacked Result

Stacked result
I used autostakkert to recover the full star field and planet from the Star Wars opening, to get a clean plate that someone requested for a project. You can absolutely do this with multiple scans, the big challenge is perfect image registration, to get the images aligned down to the pixel level before you stack them.

Post
#1014609
Topic
The Original Trilogy restored from 35mm prints (a WIP)
Time

Reel2 has been cleaned and pre-scanning to check for problems is happening now.

The last reel preview was downloaded 297 times! I’m so happy that there is still so much interest in Empire, I personally love this film.

Thanks also to the first ‘Reel Sponsor’, and to the others that have chipped in to get the reels cleaned. I’m still picking up freight, scan, and storage costs, so it is great to have the cleaning taken care of. Each reel takes up a 5TB HDD, and then you want to have a backup, so each reel eats up 2 x 5TB hard drives, so it gets real crazy, real fast.

To those who have already helped out, I sent you an Infinit invite, which will allow me to share the work in progress files with you. I use the software myself all the time, it is reliable and trouble free, and if you install it from my invite, it gives me the space to be able to share the larger versions of the files with you.
I’d love it if some of you could check the reels as they come in for missing frames, and frames you think need particular attention.

Thanks again to everyone, more samples soon!

Post
#1014239
Topic
The Original Trilogy restored from 35mm prints (a WIP)
Time

SkyderHouseMafia said:

dahmage said:

poita said:

RU.08 said:

Question - you said it could be scanned if you brought the scanner to him - what if we paid to fly him out to the scanner instead? If that were possible it’d cost a lot less, but then again I suppose he may not be able to keep the film as check baggage which would an issue.

The issue is that he won’t take the film out of his storage room except to watch it, and then it goes straight back into cold storage again.

so wait for winter? :p

“Queensland” :p

Exactly.

Winter is not coming 😃

Post
#1014216
Topic
The Original Trilogy restored from 35mm prints (a WIP)
Time

RU.08 said:

Question - you said it could be scanned if you brought the scanner to him - what if we paid to fly him out to the scanner instead? If that were possible it’d cost a lot less, but then again I suppose he may not be able to keep the film as check baggage which would an issue.

The issue is that he won’t take the film out of his storage room except to watch it, and then it goes straight back into cold storage again.

Post
#1013702
Topic
The Original Trilogy restored from 35mm prints (a WIP)
Time

Shuggy said:

Poita, thanks so much for sharing your work so far. It has certainly been educational as I was one of those laboring long under the delusion that much of the Hoth colour-timing had leaned more toward white then blue. I don’t know where I picked up this misconception -
What’s the whole thing going to cost to scan and ship?

I think it is more an assumptive memory. We think of snow as white, so we remember it that way.
Ask most people the colour of the Sun, and they will say ‘yellow’ but walk outside and take a (quick) look and you will see that it is actually white.

I forget the term at the moment, but there are a bunch of colours that we automatically associate with objects, green grass, yellow sun, blue ocean etc. and we tend to remember them this way even when we saw them quite differently at the time.

As for costs, the main cost at the moment is ultrasonic cleaning, which comes out at 0.6c per foot plus taxes and shipping, which equates to about USD150 per reel, which means a 6 reel film is about $900 or so.

Post
#1013700
Topic
The Original Trilogy restored from 35mm prints (a WIP)
Time

The ‘Australian’ print is one of 6 ‘Exhibition’ LPPs that were struck in 1983.
There may be more, but I know at least six were originally made for a few places to do a ‘Trilogy’ marathon when Jedi came out. This is the only surviving one I have found, another appeared to turn up in Atlanta, but turned out to be a Fuji print.

The UK one I am looking to get scanned next has not faded anywhere near as much as the German prints, it was kept in a Coolroom, and that seems to have slowed the fade compared to other prints I have seen.

The German print looks like the samples on the first page of this thread.

We scan at 16bits per pixel, this means the total ‘colours’ able to be captured jumps from the approximately 16 million colours that a DVD can reproduce @ 8bpp to 281 Trillion colours @ 16bpp.
In practical terms it means each channel, Red, Green and Blue, jumps from 256 shades each to 65,536 shades each.
This lets us recover as much colour as if left in the print.
It would be better to have an unfaded print or negative, but, when it comes to Empire a partially faded print is the best we have available to scan, and generally only heavily faded prints turn up, and it is getting worse by the day.

I wish we had access ten years ago, but am glad we have access now, it is literally in the nick of time to ensure the theatrical presentation of Empire is relatively well preserved, warts and all, either for future generations to see the state-of-the-art film making from 1980 as it was, or for people to look at as a base for restorations back to an imagined ‘perfect’ version from 1980, one where you kept each composite frame meticulously clean, got your mattes as precise as possible and used the finest grain film stocks etc.

My interest is in warts and all preservation of one of the most important films of the early 1980s, and hopefully with the generous help of a lot of behind the scenes people, we can get it done.
We have already had help for the scanning of other prints, by two people in the US that I will be forever grateful to, and many others that have allowed the dream to become a reality. I can’t thank the preservation community enough.

Post
#1013230
Topic
The Original Trilogy restored from 35mm prints (a WIP)
Time

RU.08 said:

suFami said:

I’m curious, why aren’t you scanning this unfaded print instead of the red faded Kodak print?

I’m pretty sure poita said the owner won’t allow it to be scanned - but it is available for viewing. 😃 By the look of this German print scan though all the picture information is there to be dug out which is terrific news!

That is correct, I’m allowed to view the ‘Australian Print’ but not allowed to scan it.
If someone has $40K, I can take a scanner with me to QLD and scan it at his place, but short of that, it won’t happen.

I got a weird message from a user I won’t name saying that he/she was calling BS on this scan, that it was clearly just the GOUT with noise added, and that it couldn’t have been stabilised to sprockets otherwise there would be blurring between frames, that all prints are now faded and a whole bunch of other ‘proofs’ that I haven’t scanned an ESB reel.

I normally don’t respond to that kind of thing, but to stop any speculation, here is Reel1 of the UK print with sprockets, soundtrack and audio. I’ve boosted the gamma a lot to let everyone see more shadow detail. The colours are still off of course, but it should sink any speculation that it is some kind of manipulated GOUT. You will also be able to judge for yourself whether the sprocket stabilisation is done well or not, as you will see them on the left hand side of the scan.

https://infinit.io/_/37sQqAm

The old links are now gone, I only have limited upload space, this one will be up for around a week.
I’d be really happy for any feedback re missing or damaged frames, there is timecode on the file, so you can reference a frame and I will know exactly which one you mean.

The only issue with this reel is I was playing with dirt cleanup where the probe emerges from the crater, so that small sequence has been cleaned up more than it would be in the actual archived version. I inadvertently had that sequence in this encode.

To answer other questions, yes we can capture the Deutsch stereo optical audio once I can get the reels cleaned. Yes, the English Audio should also be able to be captured, and if these two prints are done, it means we have 3 in total, so we should be pretty much right with not having to recreate data from any given frames.

There is no timeframe on getting the rest cleaned and scanned, the cost is around $150-$200 per reel for cleaning alone, plus shipping etc. Film is so damn heavy and annoying to ship. It seems amazing now that prints were ever shipped constantly all around the world.

I will be offline until Tuesday next week, I am travelling to Sydney on family business, so feel free to ask questions, but you won’t see answers from me for a few days 😃

Enjoy!

Post
#1012888
Topic
The Original Trilogy restored from 35mm prints (a WIP)
Time

RU.08 said:

I just had a look at the reel you posted poita, and wow does it look great! It looks really clean in comparison to other “raw scans”, notably it has a lack of emulsion lines/distortions present in others. Very, very nice indeed!

That is mostly because I paid the exhorbitant, but so very worth it, cost of getting that reel ultrasonically cleaned.
It works out to be about $200 per reel for cleaning, but it means there is practically no dirt, hairs, dust etc. left on the print, so rather than re-creating data behind dust and hair particles, you get what is actually there on the film. The dirt in the preview is the dirt on the master used to make the prints, so it was the ‘dirt’ you would have seen in the cinema in 1980 😃
It also has the really nice side effect of removing dust and debris from the optical soundtrack, so the sound is also markedly improved.

The other reasons are that the scanner used clamps the film on each frame, so it pretty much eliminates warping, and the light source is an integrating sphere, so a lot of small base scratches etc. disappear due to the incredibly diffuse light source.

The project is on hold until I can find a angel investor or 20 to help with the reel cleaning costs, then I can get the rest scanned, there are so few usuable prints left of Empire, and these two will continue to fade as time goes on, it is kind of now or never as far as salvaging Empire goes. The Star Wars Tech IB’s and Jedi LPPs will still look the same in 10 years, but by then, pretty much every Empire print will have faded into unusability.

Post
#1012887
Topic
The Original Trilogy restored from 35mm prints (a WIP)
Time

oohteedee said:

poita said:

I got a preview of Reel1 of the English print done, here is a link https://infinit.io/_/3pQJnw6 again, not graded to the print, just a test to see what kind of shape it is in.

Looks awesome.
Any chance we can get a higher resolution version of this?

I posted some high resolution frames in the thread if you want to see what full rez looks like and have a go at correcting etc. I’d love some people to try creating and sharing some LUTs by having a shot at those frames.
There isn’t a lot of point I don’t think of uploading a higher resolution version of the initial scan of the reel. You can see the colour, detail, damage, grain etc. quite clearly in the sample I uploaded. It is pretty high bitrate.

Post
#1012689
Topic
The Original Trilogy restored from 35mm prints (a WIP)
Time

As an example, I did a quick grade to the print, this is roughly correct for the skintones as they appear projected.


For lovers of grain, right click on the image and choose view image, and you can zoom in to see the grain and film damage in all its glory ;^)

Unfortunately the browser makes the colour a little washed out compared to viewing it on the calibrated system, and it will probably look different depending on your OS/Browser choice.

If anyone wants to play with some raw TIFFs and make some LUTs for fun/experience, then here are a few frames at full resolution and 16bit depth.

https://infinit.io/_/cDBpqiz

You can see how much the colour is all over the place by looking at the TIFFs, all were scanned from the same reel with the same settings.
As a guide, the area between the sprockets in theory would be ‘white’ if you are looking for an upper value not to clip.

All of these links expire in 5 days, so get them whilst you can.

Post
#1012686
Topic
The Original Trilogy restored from 35mm prints (a WIP)
Time

Generally the colour isn’t too far off, but the skintones are a little pink and the blacks are crushed.

It certainly isn’t graded to the print, but overall, there isn’t a monster colour shift from the preview, the preview is a bit dark all round, which makes the colours a bit more saturated and pushed, so the colour is off a bit, but not drastically so. For example, the blue scenes would not be grey/white on the print, but might be a little less saturated with a bit of a balance change when graded to the print.

I got a preview of Reel1 of the English print done, here is a link https://infinit.io/_/3pQJnw6 again, not graded to the print, just a test to see what kind of shape it is in. The highlights are clipped, I pushed the low end up a bit so you can see what detail is in there, but it had the effect of desaturating the colour a bit. Apart from the saturation and highlights blowout, this is a bit closer to what the prints look like projected.
I’ve had a major financial and personal setback so won’t be getting the rest done for a long while unfortunately, but thought you would all like to see what kind of shape the two prints are in.

Post
#1012643
Topic
The Original Trilogy restored from 35mm prints (a WIP)
Time

I’ve looked at the ‘Grindhouse’ and some of the grain is actually noise, so this print will look less noisy.
I also have access to a UK Empire print, I need to get it and the rest of the German print cleaned properly (ultrasonic and buffer cleaned) which is expensive (around USD700 for 6 reels ~ 2 hours of footage) and then scanned and stored. If you want to help out, check my signature at the bottom of each of my posts.
Hopefully any missing or badly damaged frames will be in the second print, so if I’m lucky I won’t need any other sources.
In the meantime I will continue to work on Reel-1.

Post
#1012641
Topic
The Original Trilogy restored from 35mm prints (a WIP)
Time

The only grade I will be doing will be to match it to the print. The reel posted is a little crushed, and the colour doesn’t quite match the print but the rough colour is correct.
I have watched the unfaded ESB print 6 times over the past year, and looking at this print, and another UK print that I have gotten a hold of I can say a few things with absolute certainty.
The cave scene is very blue in all prints, and most of the snow shots that are not in full daylight are also quite blue. e.g. Han finding Luke, Luke seeing Obiwan in the snow, inside the cave etc. The full daylight shots with the snowspeeders and the main hoth battle are much closer to white/grey with the slight blue tint that you get working in snow.

There is much less gate weave than in the Grindhouse, the scanner I use is rock solid locked to the sprocket holes, so the only gate weave left is from the original camera, not from the projection/scanning rig. I lock to the sprockets as to stabilise on the footage takes the risk of smoothing out shots that may have been handheld or slightly unstable on purpose. Lucas tends to shoot in a documentary style, so I want to preserve any movement that is on the film, but do not want to introduce any extra movement due to the scanning process.

I think for a new audience, they would need to regrade the film, both Star Wars and Empire have their timing all over the place. This isn’t surprising as in the late 70s and very early 80s, only MGM and MovieLab had realtime screen timers. All other labs were running a twin projector ‘Comparator’ that was hand cranked and it took around 5 hours or so to make the notes to time a 20 minute reel. The colorist or Front Line Timer/Head Timer as we were called back then, would sit and watch the film and take notes. You would write down the numerical adjustments that you thought each shot needed, so for the cave scene, the FLT would be able to see in their mind that to get the cold blue of the shot that the Director wanted, the adjustment would now be 12,12, 26 to be added or subtracted to the printer file. This would then go away and you wouldn’t see how it looked until a new print was made following the math you had done on the printer file.
So compared to a modern film ,the colour timing is, understandably, all over the place. It depended how good the FLT could imagine the required colour changes while watching the film in a cinema and writing down notes, how good the techs were that then did the new print, and how much money and time you had, each print made was up to 40 hours of time with the FLT watching and making corrections, and then the cost and time for a new print to be struck, and watched and re-timed again. With the time pressures and budgets of Star Wars and Empire, I would be surprised if a lot of time and money was put into the grade.

So the version I will be working on certainly won’t be to everyone’s taste, the black levels are all over the place on the prints, the timing is all over the place, some shots don’t match as well as they should, there is a shitload of dirt in many of the composite shots that was printed into every print, and I stabilise to the sprockets, so the camera weave will also be there.

In short, it will be how it looked in 1980, colour, neg dirt, grain warts and all. People later can make their own personal versions I’m sure, with less grain, a much better grade, removing the comped in dirt and so on, for what will be an improved viewer experience, but my goal is archival.

Post
#1012395
Topic
The Original Trilogy restored from 35mm prints (a WIP)
Time

The X-rite probes all seem pretty good, be careful 2nd hand though as they do drift over time.
Of course, they are at the low end of the market, but unless the probe is faulty, you end up with a much better reference point than not using one.
I’ll make some images up soon to show why it is so important, but I honestly don’t take feedback on board from anyone that has not at least got a basic calibration setup happening for their workflow, as you say, they are often commenting on things that are unique to their screen/OS/media player, and not in the actual files themselves.

The easiest thing to me, is to buy a cheap BMD output card, a cheap i1 probe and use the free DisplayCAL software and use the free version of daVinci Resolve to look at colour on a separate monitor/TV and be able to know 100% that what you are looking at is actually calibrated, without your player or Operating System or incorrect colourspace settings getting in the way. For a total of less than $200 you can have a truly colour managed system that you can trust, which is pretty amazing really.

Post
#1012329
Topic
The Original Trilogy restored from 35mm prints (a WIP)
Time

Spaced Ranger said:

Whoa, thanks! Didn’t know they were widely available (beyond the specialty shops). Will definitely check out your recommendations (the cheaper ones, that is)!

If you can stretch to the Munki Display, it is by far the best option for the $$, but avoid the packaged software and use DisplayCAL.

Post
#1012324
Topic
The Shining - 35mm print opportunity (a WIP)
Time

Silverwook, good news, the ‘lost’ print from Canadia has turned up, and I’m scraping some money together to get it shipped to the scanner in the US.

On that, the scan of your Shining Print is completed, but I do not have any drives left to send to the scanning facility, or funds for the second print to be scanned. If people are interested in seeing both the prints scanned, let me know. Nothing would be going to me, it would be going to the person doing the scanning for me in the US. They need an SSD for the scanner to be able to continue scanning prints on my behalf. The one I had donated to them from my own pocket two years ago needs replacing, and I simply can’t afford to replace it myself at the moment.

Post
#1012319
Topic
The Original Trilogy restored from 35mm prints (a WIP)
Time

You can get the colormunki smile for $60
http://www.ebay.com/itm/X-Rite-ColorMunki-Smile-CMUNSML-/142172525423

Or the better colormunki display is often on sale for around $100-$150
http://www.ebay.com/itm/X-Rite-Colormunki-Advanced-Display-Calibration-Model-CMUNDIS-/361826483732
I would recommend it, along with the excellent and free DisplayCAL
https://displaycal.net/

Or if you have the money, the CR300 for around $17000
http://www.shopfsi.com/CR300-p/cr-300-rh.htm

Spaced Ranger said:

poita said:
I’d recommend grabbing a cheap colormunki or i1 probe at a minimum …

Ouch! Just looking at those prices (of the “non-Pro” versions). Have mercy!

Couldn’t we just use the red/blue glasses from the movie theaters? 😦

BTW, those do look pretty cool. Ah, to dream.