- Post
- #326594
- Topic
- Is laserdisc better than VHS?
- Link
- https://originaltrilogy.com/post/id/326594/action/topic#326594
- Time
Threads moved and merged. There was no need to double-post.

Threads moved and merged. There was no need to double-post.
http://www.metro.co.uk/news/article.html?in_article_id=248865&in_page_id=34
I have to agree with the above. All texture has been smoothed out giving an artificial, over-processed feel to the images.
(FWIW I made the same mistake when I did this.)
Just noticed that after the update, all posts made by ignored users are displayed (with both Firefox 2 and IE 6).
PaulisDead2221 said:
.... I have a small side project in which I'm trying to create an general approximation of the original six track mix. Sources include the 2004 SE DVD 5.1 surround track, the 1997 SE 5.1 surround track, the stereo six track mix preservation from Belbucus, as well as the isolated score. The idea is to repair/re-approximate/mix/rework the various mixes into a 5.1 experience of the original six track.
This side project definitely gets the Moth3r seal of approval. ;-)
Seriously, I've considered doing the same thing myself.
I assume your audio will be GOUT-synched? A good reference would be the '93 mix, run through a software pro-logic decoder to get four (left/right/centre/surround) separate channels. The effects in the extracted surround channel could be replaced with the equivalent full-range sounds + LFE elements from the '97 mix where applicable. (Is there actually anything useable in the '04 mix? According to general opinion, it's an abomination.) Of course, the '93 additions would have to be removed to be truly '77 authentic.
When you've got a rough draft together, it'd be worth contacting the forum audio experts (thinking Neil S Bulk and Belbucus in particular) and asking if they could audition and comment on your mix.
http://cgi.liveauctions.ebay.com/ws/eBayISAPI.dll?ViewItem&item=330248749614
Starting price seems a bit steep, considering it’s only a wooden prop that doesn’t even hover! 😃
Placing a TV in a room corner is not the ideal setup for a home theatre.
An Essential Guide to Home Theater Speaker Placement
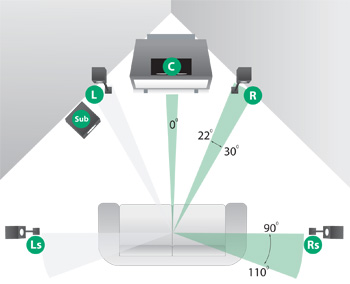
I imagine it would be even more awkward/messy with a 7.1 system.
I have the FLAiR Xvid. The quality is not bad, but I seem to recall there were some IVTC artefacts noticeable in the opening cartoon sequence. There was talk of someone on here doing a DVD version but I don't know if it ever happened.
So you are suggesting that someone should take the video ripped from DVD, and insert the uncensored frames from the laserdisc? How would you know which frames to replace, is there a definitive list somewhere, or would you have to go through the entire film frame-by-frame?
Also, when played back at normal speed, would you actually notice the insertions?
^^ Exactly what he said.
And they would do it for free, and I daresay take more care over the transfer.
"George's".
See the link in my sig.
Maybe I should have asked for ratings out of 10 instead of an order of preference.
Anyway, I devised a statistical method of weighting the "votes" above, and came up with this:
1. WALL·E 0.70
2. Toy Story 0.63
3. The Incredibles 0.58
4. Toy Story 2 0.54
5. Finding Nemo 0.53
6. Monsters, Inc. 0.44
7. Ratatouille 0.37
8. Cars 0.34
9. A Bug's Life 0.25
(not sure how accurately this represents a summary of the posts above)
Compare with the IMDb ratings:
1 WALL·E (2008) 8.8
2 Ratatouille (2007), Incredibles, The (2004) & Finding Nemo (2003) 8.2
5 Toy Story (1995) 8.1
6 Monsters, Inc. (2001) & Toy Story 2 (1999) 8.0
8 Cars (2006) 7.5
9 Bug's Life, A (1998) 7.3
Try VirtualDub for capturing.
Also, Macrovision removal has been discussed several times previously. A search of this forum should bring up some useful threads.
monkeyjb1988 said:
I bet one of you guys wrote it. :)
No, "us guys" know that the original 6-track mix was 4.2, not 5.1.
;)
Discussed in the V8 thread a while ago, but I've recently thought of something which may be worth considering.
Normally I advise calibrating black and white points (aka brightness and contrast) in the capture card driver settings, so that no tweaking is required before encoding.
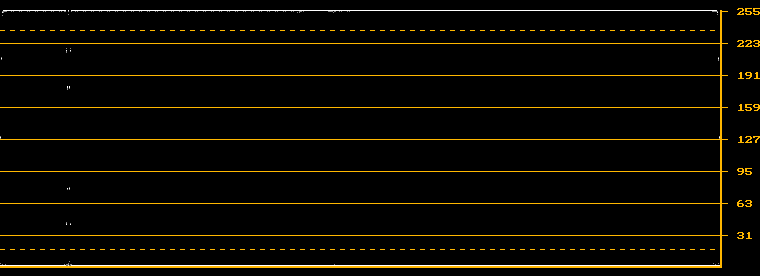
Over the weekend I was playing with an image that contains only video black and peak white (the needle pulse pattern on Video Essentials):

If you look at the luma levels of the image ripped directly from the DVD, you can see thin lines at 0 for black and 255 for white (this is after conversion to RGB, the actual range is of course 16-235):
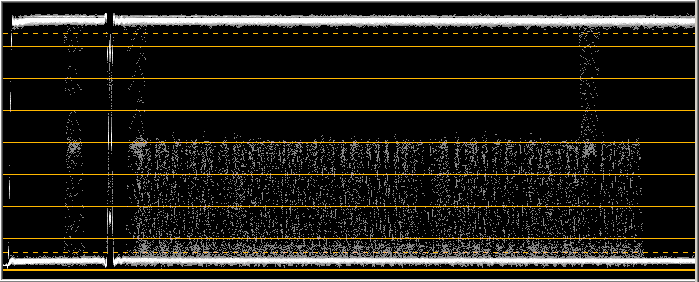
Here's a capture of the same pattern from laserdisc; the analogue noise has the effect of making the black and white lines much thicker and fuzzier (ignore the stuff between black and white, that's just some grey text present on the laserdisc version):
Brightness and contrast have been adjusted so that 0 lies in the centre of the "black" line, and 255 lies in the centre of the "white" line. But then I started thinking: what if you are planning to use the multiple capture averaging technique to reduce analogue noise? In setting the black and white points like this, you have imposed a hard limit on everything "above white" and "below black". Surely this will skew the result of the average luma calculation?
Now, take a close look as these plots:
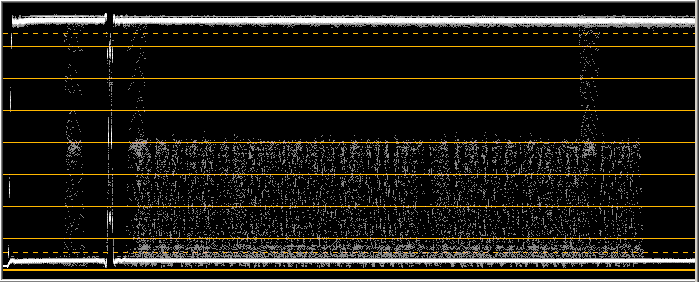
In the first image, the black and white points are set so that the majority of stray noisy pixels above white and below black are captured. The second image shows the effect of a 5x capture average (actually it's just TemporalSoften(2,255,255) applied to a still frame capture, but effectively the same thing). You can see that the averaging has the affect of making the lines thinner (more noticeable in the lower line that represents black), which means less variation/noise. (It'd be interesting to see this frame captured from an X0 - apparently it has 5 NTSC decoders in parallel, giving you the noise reduction advantages of averaging in a realtime output.)
The final step would be to tweak the brightness and contrast in your script, after the averaging stage.
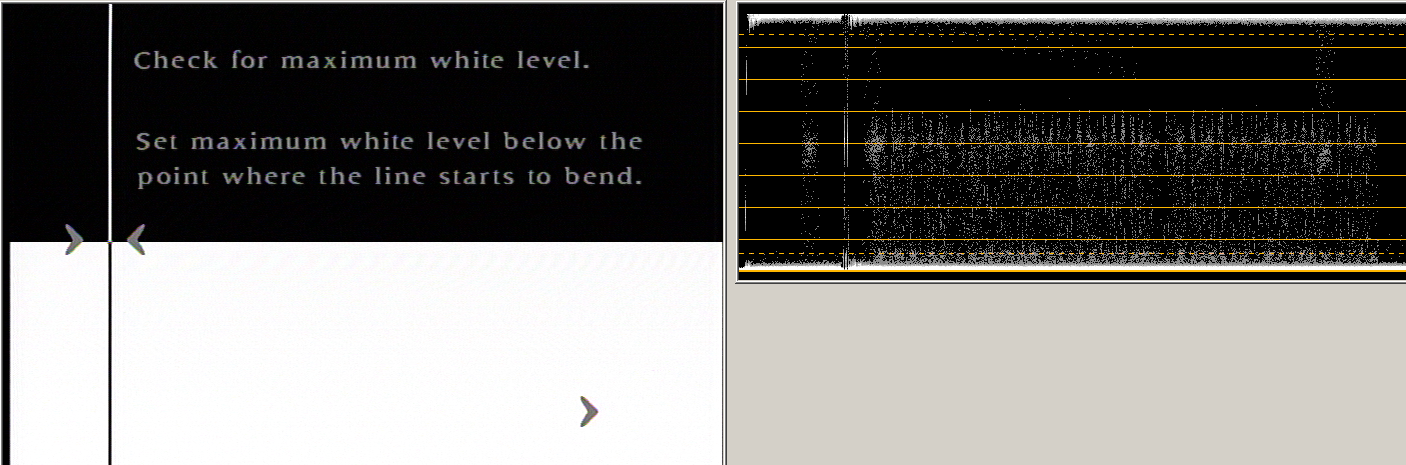
Arnie, check out this thread I just maded: Setting sharpness for analogue capture
"The Sharpness control adjusts the amount of detail enhancement or high frequency peaking to be added to the video signal. In this picture the transitions from the gray background to the black lines are clean. In most sets, increasing the Sharpness control will add extra edges to at least some of the transitions in the picture, making them stand out. The problem is that you are adding information to the display that is not part of the original signal. Noise is also added to the picture when increasing the Sharpness control. While this added noise may give the impression of more detail, it actually has little or nothing to do with the original signal or any real picture detail. In both cases, turning the Sharpness control up to the point of adding false information is pushing it beyond its correct setting. The correct position of the Sharpness control is just below the point where extra lines are being added to the picture."
(From http://www.videoessentials.com/products_history.php)
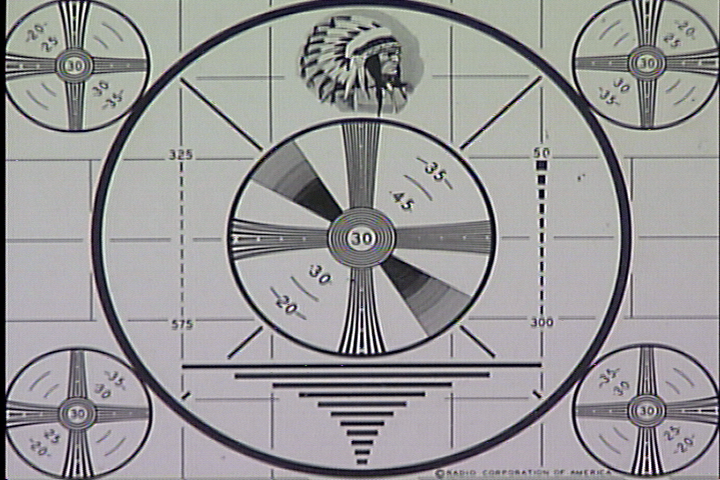
Here are a couple of frame captures of the "Indian Head" pattern. It's best to download and zoom in to see the effects I'm talking about.
1. 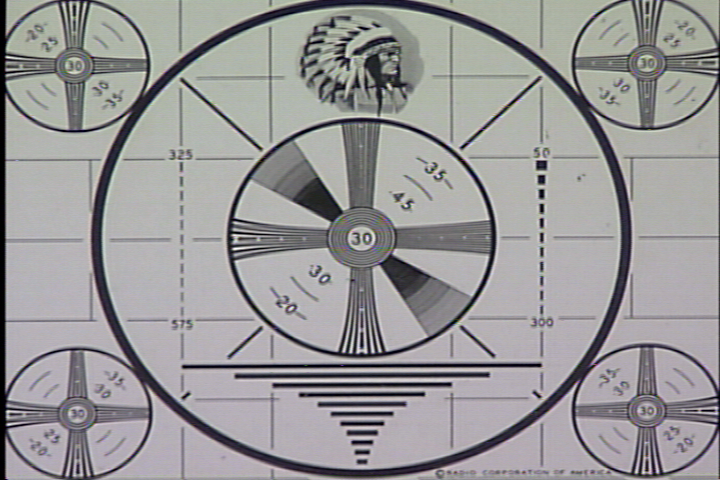 2.
2. 
On the first, the sharpness is I think about right. You can still see some extra edges, but the sharpness control on my capture card doesn't give a smooth adjustment, the next step down is extremely blurred. (Also, around the centre circle you can see an example of rainbows from imperfect Y/C separation).
The second shows what happens if you increase the sharpness. The image looks more detailed, but if you zoom in you can see the white halos to the dark edges that have been artificially added. There is also a lot more noise in the image.
Just interested after reading the WALL·E thread. Here's mine:
1. Toy Story 2
2. Toy Story
3. Finding Nemo
4. The Incredibles
5. Monsters, Inc.
6. A Bug's Life
7. Ratatouille
Not seen WALL·E or Cars.
I did notice that VirtualDub added an option to capture from the screen a while ago. I've never tried it so I can't say how well it works.
There are other programs available that are purely screen capture utilities, but the only two I know of - Camtasia and HyperCam - are both payware. Maybe Google could find you a free alternative.
Another pay option is Tunebite Platinum, which appears to be a capture program designed specifically for DRM removal.
Yes, that's the bandwidth limitation of laserdisc video I'm afraid.
The halos make the image look sharper, but it's artificial - you're not actually gaining any resolution.
Do you have a "sharpness" slider in the capture card settings? (In VirtualDub's capture mode, you can get this from either Video->Levels, or Video->Capture Filter, Proc Amp tab.)
If so, try reducing the sharpness.
Max_Rebo said:
... as for the levels I'm no expert but I'd say you need to reduce the brightness and increase contrast on the capture card settings to try and use the full range of the capture card, this will give much better results than adjusting afterwards with Avisynth.
I've been thinking about this, and concluded that adjustment afterwards in Avisynth is the better option if you're doing a multiple cap average. Will post in the technical forum later when I've got some example screenshots showing what I mean.
Yes, get DVD Decrypter. There are some newer protection schemes that it can't handle, but it's still an essential piece of software IMO.
AFAIK, there is no software currently available that can remove DRM from videos purchased from itunes.
A possible work around is to play the video and record via a screen-capture app, then convert the recorded file.
Hunter6 said:
Everything from pre 1977 to 1983 is Canon to me
Everything?
Even the Holiday Special? ;-)
Story here
EDIT: better story here
I'm not saying anything...