
- Time
- Post link
What you are describing is called noise reduction.

I have been kicking around an idea for a sort of end-all, be-all technique for recruiting image detail from film grain. I briefly described it on the 35mm thread and talked with Dr Dre about it as well. The somewhat involved explanation in my original message is below, but first, some background on the film process and film grain:
So let’s take Mike’s Legacy project as an example of how detail recruitment is done in its current best-case scenario. From my message to Dr Dre:
Mike’s method involves stacking up to five of the same frame on top of each other from sources of varying quality, and doing a weighted average of the pixel values. He also recruits data from neighboring frames, but let’s just focus on the stacked frames for now. So say he has 5 stacked frames. Two are slightly sharper (Tech frames) and 3 are slightly softer (Kodak frames). If you do a weighted average of every pixel, the softer frames will tend to override the sharper frames, since there are more of them. The result is a cleaner, but softer image. If you’re looking to retain detail, your best bet is to stick with the sharpest frame and discard the rest, since any averaging will invariably soften the image, regardless of the increase in clarity.
I think there’s a way to keep both the detail and the grain-free look. You would probably need a scan that is in 8-10k quality, so that each grain (more accurately each dye cloud) is distinguishable from another, at least mathematically. It could be that a 4k scan may have this level of detail. In any case, it should be possible for a sufficiently robust algorithm to examine the frame and identify the center of each dye cloud, recognizing local minima in luminosity for each color layer. With this map generated, it makes transparent the pixels not directly surrounding the center of each dye cloud, so you have in effect made cheesecloth of the image. You keep only the center of the dye cloud, information that is the most likely to have come from an actual photon impacting the silver halide crystal at the center of the dye cloud. In a way, the map should contain all of the actual color and luminosity information necessary to digitally ‘develop’ a new image by expanding each dye cloud back to its original size. However, with multiple stacked images, this process is repeated for each one and the results of this are overlaid, with the sharpest image on top and the softest image on the bottom.
This process could also be applied to neighboring frames in a more traditional super resolution method. If the center of two dye clouds is targeted to the same pixel, then and only then should a weighted average of the pixels be applied.
TL;DR version: Taking the pixels from a high resolution scan that are most likely to contain actual image information and discarding the space in between dye cloud centers, then overlaying multiple prints or sequential static frames, you should theoretically be left with an image with much higher detail and sharpness, since only the noise is removed, and the detail is multiplied over the number of sources used.
It would be interesting to run an experiment to test this theory. One would need to take a sequence of photos of the same object, preferably with grainy film stock, then develop them and scan them with a high resolution film scanner. After that, you would need a program that identified local luminance minima (the darkest parts of the grain are where a dye cloud formed) then applied a weighted transparency to any pixels not in these sections. Process the images, then overlay them, and compare the result with the same image stack run through a conventional super-resolution algorithm. With enough frames, one could upscale the resolution with a similar jump in actual image detail until running into the limit of resolution dictated by the quality of the camera lens.
This process, if it works, could perhaps be used on the infamous speeder and sandcrawler shots to bring them in line with the rest of the film.
You probably don’t recognize me because of the red arm.
Episode 9 Rewrite, The Starlight Project (Released!) and Terminator Ultimatum,
What you are describing is called noise reduction.

Very interesting !
Would it work with prints done by imbibition (Technicolor) or only with prints done by emulsion of multiple layers (as Eastman)? If I’m not mistaken, it is the difference between the two process.

Fascinating idea, I’d love to see some examples.
Your “cheesecloth” analogy is similar to an untested super-resolution concept of mine; I imagine a still frame of limited spatial resolution, say 960x540 (1/4 of 1920x1080 HD), in a digitized image sequence. If the goal is to upscale the still image with real detail rather than interpolated pixels, first I would like to enlarge the chosen still image in an unusual manner: copy the chosen 960x540 still image “X” as a layer atop a blank 1920x1080 “O” canvas, where the 960 horizontal pixels and 540 vertical pixels are spaced out with blank (transparent) pixels between each sequential picture element.
For example, Pixel Row 001, Column 001 of the still image (upper right-hand corner, presumably) fits on pixel 0001,0001 of the canvas. Pixel 0001,0002 of the canvas is left blank. Canvas “O” Pixel 0001,0003 contains Image “X” Pixel 001,002. Canvas “O” pixel 0001,0004 is left blank, but Image “X” pixel 001,003 is mapped to Canvas “O” position 0001,0005, and so on for the remainder of canvas line 1.
Canvas line 2 is left completely blank all the way across. However, Canvas position 0003,0001 is filled with Image Pixel 002,001, but Canvas position 0003,0002 is left blank. Then the spaced out pixel pattern repeats.
In other words, we are stripping each image pixel away from its neighbor, row by row and column by column, and putting one blank pixel space between them. We aren’t throwing away any pixels, but we are shuffling each image pixel over (along rows) or down (columns) in a quasi checkerboard fashion.
In text form (monospaced font would work best):
Image “X” at 4 pixels x 3 rows:
XXXX
XXXX
XXXX
Image “X” scaled by a factor of 4 with typical spatial interpolation, where only “X” are unprocessed pixels and “x” are interpolated pixels (false detail is 75% of the upscaled image):
XxXxXxXx
xxxxxxxx
XxXxXxXx
xxxxxxxx
XxXxXxXx
xxxxxxxx*
Canvas “O” at 8 pixels x 6 rows:
OOOOOOOO
OOOOOOOO
OOOOOOOO
OOOOOOOO
OOOOOOOO
OOOOOOOO
Image “X” layered atop Canvas “O” with no scaling, in upper left corner:
XXXXOOOO
XXXXOOOO
XXXXOOOO
OOOOOOOO
OOOOOOOO
OOOOOOOO
Image “X” layered onto Canvas “O” with every-other pixel spacing beginning at 0001,0001:
XOXOXOXO
OOOOOOOO
XOXOXOXO
OOOOOOOO
XOXOXOXO
OOOOOOOO
So far what I have tried to illustrate is a small image that has been peppered onto a larger canvas without destructive upscaling. However, think of the pixel “peppers” landing in a strict grid pattern, and the canvas as clear glass rather than white canvas.
Other than the example of a typical spatial upscale with the very large number of interpolated pixels, we have upscaled nothing, nor performed any super-resolution upscaling. So next let us choose another still frame from our image sequence, ideally one which is nearly identical to the earlier chosen frame, such as the very next frame. Little, if any, motion of the camera or subject… perhaps the film grain is the biggest change from the previously chosen still frame… perfect! We will now repeat the peppering of the image “Y” pixels onto a canvas of exactly 4 times the image’s dimensions; however there is an important change from the earler expansion. This time, the still image “Y” pixels will be remapped as follows:
Image “Y” layered onto Canvas “O” with every-other pixel spacing beginning at 0001,0002:
OYOYOYOY
OOOOOOOO
OYOYOYOY
OOOOOOOO
OYOYOYOY
OOOOOOOO
We will choose two more still images from the image sequence and repeat the pixel remapping, each onto a 4X canvas, this time beginning on canvas line 2.
Image “Z” layered onto Canvas “O” with every-other pixel spacing beginning at 0002,0001:
OOOOOOOO
ZOZOZOZO
OOOOOOOO
ZOZOZOZO
OOOOOOOO
ZOZOZOZO
Image “W” layered onto Canvas “O” with every-other pixel spacing beginning at 0002,0002:
OOOOOOOO
OWOWOWOW
OOOOOOOO
OWOWOWOW
OOOOOOOO
OWOWOWOW
With the four separate expanded canvases we’ve created, we are now ready to combine them into a single super-resolution image by stacking them, allowing the solid pixels to show through the transparent layered blank canvas pixels to reveal a single image composite:
XYXYXYXY
ZWZWZWZW
XYXYXYXY
ZWZWZWZW
XYXYXYXY
ZWZWZWZW
If your crop is water, what, exactly, would you dust your crops with?
@g-force: Noise reduction can work on a single image, and uses algorithms that reduce variance in luminance over small areas while leaving larger variances alone. This leads to the ‘plastic-y’ look of many film restorations. This process isn’t that. This process requires the use of several similar frames to build a map of the image, where the center of the grains are treated as the image detail. In fact, one could consider this to be a sort of anti noise reduction, since the ‘noise’ is the only thing that remains of each frame. Remember, in film, the grains are the ‘DNA’ of the image. If you only had a map of where each grain was positioned in the image and its color/luminosity, you could re-develop a convincing facsimile of the image, with grain intact. On the other hand, if you erased the grain (or placed new grain after erasing it), the DNA would be lost and no further information could be gained from this process.
Very interesting !
Would it work with prints done by imbibition (Technicolor) or only with prints done by emulsion of multiple layers (as Eastman)? If I’m not mistaken, it is the difference between the two process.
I’ve scanned some Technicolor frames at fairly high resolution, and I doubt that this process would work on those frames because of how soft the grains are. You are correct that the print is made by imbibing it with dye, not using film grain to ‘grow’ a new image, so unless the grains from the source print are still identifiable, the process will not work.
@cameroncamera: I see what you’re going for here, I think. That would be a process for upscaling a digital image, but if I’m reading it right, wouldn’t there be an issue with duplicating image detail across pixels, causing another form of interpolation smearing? Each image is expanded so that there is a one pixel gap between each pixel. If A is a pixel and B is an empty pixel, the result would be this:
ABABAB
BBBBBB
ABABAB
BBBBBB
The second frame would then be shifted one pixel to the right, filling in the B spaces in the 1st and 3rd rows. The third frame would be shifted down, so that half of the 2nd and 4th rows would be filled, and the fourth frame would be shifted down and to the right, completing the picture.
So far that’s your process, as I understand it. Now imagine that the image showed a red light in the upper left corner of the image, taking up only one ‘A’ pixel. If each of the four frames showed relatively similar detail, the upscaled image would show that single pixel of red repeated four times in a box configuration.
I don’t have any idea about upscaling a digital image, since the pixels are the detail. Perhaps the only way to really upscale digital content like that would be through an adaptive learning algorithm such as the ones being developed by Google, wherein it identifies common objects and upscales their detail with images culled from a library of images. http://newatlas.com/google-raisr-image-upscaling-super-resolution/46434/
You probably don’t recognize me because of the red arm.
Episode 9 Rewrite, The Starlight Project (Released!) and Terminator Ultimatum,

The most promising upscaling technique is the neuron network - the one in that google link, but there are also others; result are astonishing, even if the final result is not really an upscale, but more a reconstruction; but, who cares, if the result is great? Let’s wait for someone who would bring these kind of techniques in AviSynth - it will happen, sooner or later…
Meanwhile, we should rely on the old techniques; I think mixing different ones could lead to a better result than using a single one. I developed one on my own, simple, but effective - the PaNup: https://forum.fanres.com/thread-25.html - I used in many projects, and it works quite well; can’t say how much can improve the quality in comparison of a single upscale, but there is an improvement; I encourage everyone to take a look and try it - it’s easy, and doesn’t require a specific tool like AviSynth…
Sadly my projects are lost due to an HDD crash… 😦 | [Fundamental Collection] thread | blog.spoRv.com | fan preservation forum: fanres.com

I don’t have any idea about upscaling a digital image, since the pixels are the detail. Perhaps the only way to really upscale digital content like that would be through an adaptive learning algorithm such as the ones being developed by Google, wherein it identifies common objects and upscales their detail with images culled from a library of images. http://newatlas.com/google-raisr-image-upscaling-super-resolution/46434/
will this be able to upscale adywans star wars edit to 4k etc.?
@cameroncamera: I see what you’re going for here, I think. That would be a process for upscaling a digital image, but if I’m reading it right, wouldn’t there be an issue with duplicating image detail across pixels, causing another form of interpolation smearing? Each image is expanded so that there is a one pixel gap between each pixel. If A is a pixel and B is an empty pixel, the result would be this:
ABABAB
BBBBBB
ABABAB
BBBBBBThe second frame would then be shifted one pixel to the right, filling in the B spaces in the 1st and 3rd rows. The third frame would be shifted down, so that half of the 2nd and 4th rows would be filled, and the fourth frame would be shifted down and to the right, completing the picture.
So far that’s your process, as I understand it. Now imagine that the image showed a red light in the upper left corner of the image, taking up only one ‘A’ pixel. If each of the four frames showed relatively similar detail, the upscaled image would show that single pixel of red repeated four times in a box configuration.
I don’t have any idea about upscaling a digital image, since the pixels are the detail. Perhaps the only way to really upscale digital content like that would be through an adaptive learning algorithm such as the ones being developed by Google, wherein it identifies common objects and upscales their detail with images culled from a library of images. http://newatlas.com/google-raisr-image-upscaling-super-resolution/46434/
Ok yes I am glad my description made sense. Mine is an untested concept, though it may me exactly the manner in which typical temporal super-resolution algorithms work. I doubt that I am coming up with anything new. I think, however, that film-based image sequences could result in better upscaling than images originating from a digital sensor. (I do understand that a digitized film frame sequence is captured with a digital sensor, but I have hunch that the random film grain and slight gate weave of analog image capture would work advantageously for temporal super-resolution.)
You do bring up an excellent point about tiny image details that are effectively 1 pixel in size being inappropriately quadrupled when upscaled. In my example I presented a strict sequential approach, where the first pixel of the first of four frames is always placed in the upper left position on the larger canvas, then the second frame slots into the next available position, and so on. But, what if the super-resolution algorithm could intelligently place the expanded frames to maximize detail? Say, the super-resolution algorithm could talk to a stabilization algorithm? Perhaps analysis of random film grain and slight gate weave amongst the selected film sequence frames could rearrange the upscaled pixels to maximize real detail instead of magnifying errors in image detail.
If your crop is water, what, exactly, would you dust your crops with?

We routinely stack thousands of images when doing astrophotography, to reduce the noise, and increase the resolution, it works well and the process is well documented and easy to implement.
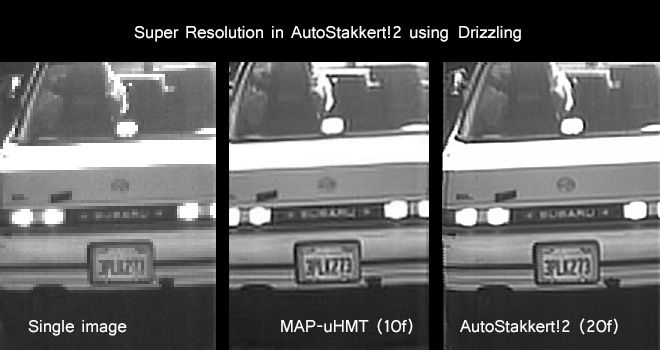
Some examples with autostakkert here of getting extra resolution, this time using 20 frames of security camera footage instead of astro-images:
Also for imaging with cheap gear, such as using a webcam to image Jupiter and stacking a few thousand images to get the detail in and the noise out.
Webcam Footage

Stacked Result

I used autostakkert to recover the full star field and planet from the Star Wars opening, to get a clean plate that someone requested for a project. You can absolutely do this with multiple scans, the big challenge is perfect image registration, to get the images aligned down to the pixel level before you stack them.
Donations welcome: paypal.me/poit
bitcoin:13QDjXjt7w7BFiQc4Q7wpRGPtYKYchnm8x
Help get The Original Trilogy preserved!
I’ll whip up a quick example for a scene I have multiple prints of.
Donations welcome: paypal.me/poit
bitcoin:13QDjXjt7w7BFiQc4Q7wpRGPtYKYchnm8x
Help get The Original Trilogy preserved!
Okay, here goes. I didn’t spend much time on this, so far better results are possible, I didn’t have time to work out the best alignment points and settings, and these are from Tech prints, so there are some RGB alignment issues in the source. I also used raw scans, so the damage and dirt is still there, it would be better had they been cleaned up first.
I found a scene I have a few scans of. The scans are all in 1080P.
I loaded the scans into elastix to roughly align them, then exported to autostakkert to stack and drizzle the images.
The source frame was this. (right click to view at full 1080P)

After a (very rough) stacking, we get this result at 1080P

You can see most of the noise has disappeared and more detail revealed in the trooper and in the sand patterns behind him.

So to compare a before and after stacking with a close-up of our favourite trooper, see if you can work out which is the before and which is the after…

Some Split-screen compares: (right click and view the image to see them at full Rez)


The next step is to enable drizzling to try and get a super-resolution thing happening. This normally would mean a lot of experimenting to find the best settings, these were just a first guess, it could be made better.
So to scale our original frames to a stacked and super-rezzed 4K image (4096 pixels wide vs 1920 pixels wide) we get this:

The image on the left is the drizzled ‘super resolution’ image, on the right, is the original frame upscaled to the same size in Photoshop’
Finally, a full 4096 pixel wide image created via stacking and drizzling the 1080P source scans:
Unfortunately IMGUR reduces the image quality quite a bit, so I have linked to the file instead.
Anyway, I have probably bored everyone shitless now, even though that is a quick example, not a great one by any means, but I thought I’d share the kind of thing I’ve been messing with. As I mentioned, I’ve been doing it with astrophotography for many years, and those programs and techniques can be quite useful for image processing in general.
Donations welcome: paypal.me/poit
bitcoin:13QDjXjt7w7BFiQc4Q7wpRGPtYKYchnm8x
Help get The Original Trilogy preserved!

The silence is from my jaw dropping. Certainly not boring stuff poita… Damn!
Agree, we learn something new every day, thanks poita!
Sadly my projects are lost due to an HDD crash… 😦 | [Fundamental Collection] thread | blog.spoRv.com | fan preservation forum: fanres.com
That’s absolutely beautiful! I don’t think these processes are boring at all.
You probably don’t recognize me because of the red arm.
Episode 9 Rewrite, The Starlight Project (Released!) and Terminator Ultimatum,
The thing about film, as opposed to video, is that the detail captured by film can theoretically be precisely mapped to the very center of the dye clouds that make up the grain, whereas there is no way to know which pixels of a video image contain useful detail. Here’s a quick and dirty visualization of the idea:

Say that this is the edge of an object. When captured on film, photons of light bounce onto the film and react with microscopic silver halide crystals. When the film is developed, the halide crystals react with the surrounding substrate and create dye clouds, which can be viewed as grain:
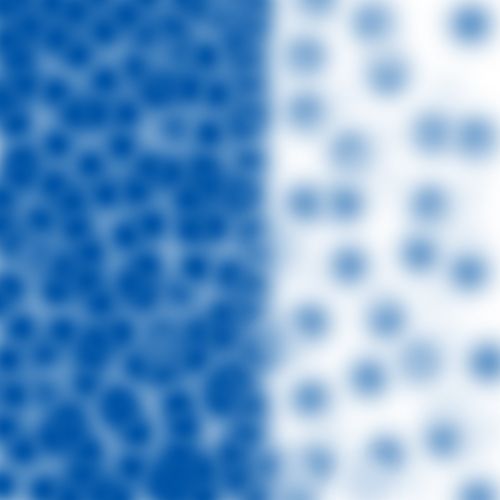
Now this sharp edge is blurred by the process of creating the dye clouds. Compounded by several layers of colored substrate, the grain becomes complicated, such as in the ‘before’ example posted by Poita above. In that example, beautiful though it is, the image can never be sharper than the sharpness of the dye clouds. To understand this, consider that no matter how many pictures are taken of a sharp edge, each one will be blurred by the radius of the dye cloud. No matter how these are averaged together, and no matter at what resolution, this dye cloud radius remains.
Now if you were to map the centers of the dye clouds, it may look something like this:

At this point the algorithm can determine the most valuable parts of the image. The key to greater resolution is that each frame of film contains a slightly different grain pattern, meaning that the centers of these dye clouds shift. Out of 20 or so frames, they may all have a substantial number of dye cloud centers that are in unique positions. Finally one can intelligently find the points in the film most likely to contain unique image data, on a photon by photon basis. This is not possible with a digital video signal, since again, there is no way to tell which pixel is more likely than another to contain detail rather than noise. Combining enough images makes it possible to recover a clean image with a sharp edge, almost regardless of the coarseness of the grain.
With an averaging super-resolution algorithm blurriness can never fully be removed. with Halide Crystal mapping you can potentially regain the unblurred edge.
You probably don’t recognize me because of the red arm.
Episode 9 Rewrite, The Starlight Project (Released!) and Terminator Ultimatum,
“This is not possible with a digital video signal, since again, there is no way to tell which pixel is more likely than another to contain detail rather than noise.”
If you have enough samples, you can statistically work out which pixels contain noise and which contain information, that is the basis of image stacking. The signal to noise ratio is lowered by the root of the number of images.
Or do you mean images originally captured on a digital camera, not digital scans of film based capture?
I feel that scanning multiple prints at high resolution, and then stacking them achieves the same thing, but I’m probably missing something in my understanding here.
I’d love to see a proof of concept from your work, I’m happy to provide you with some higher resolution images, something like 6000x4000 pixels should be enough to work with?
I’m all for any technique that might improve the image.
Donations welcome: paypal.me/poit
bitcoin:13QDjXjt7w7BFiQc4Q7wpRGPtYKYchnm8x
Help get The Original Trilogy preserved!

poita said:
[brilliant post]
This is truly astounding and helps us get a better sense of what Legacy is doing: grain removal whilst gaining detail. If Legacy doesn’t get an official release (though hopefully it does) I hope some of the projects here eventually evolve to this point. Although I do realize how time-consuming it would be to have pixel-perfect image alignment so that dream is probably way off in the distant future.
The main problem is getting enough prints, to get really great results you would want 20 or more.
Though even having three can make a good inprovement.
Donations welcome: paypal.me/poit
bitcoin:13QDjXjt7w7BFiQc4Q7wpRGPtYKYchnm8x
Help get The Original Trilogy preserved!
“This is not possible with a digital video signal, since again, there is no way to tell which pixel is more likely than another to contain detail rather than noise.”
If you have enough samples, you can statistically work out which pixels contain noise and which contain information, that is the basis of image stacking. The signal to noise ratio is lowered by the root of the number of images.
Or do you mean images originally captured on a digital camera, not digital scans of film based capture?
I feel that scanning multiple prints at high resolution, and then stacking them achieves the same thing, but I’m probably missing something in my understanding here.
I’d love to see a proof of concept from your work, I’m happy to provide you with some higher resolution images, something like 6000x4000 pixels should be enough to work with?
I’m all for any technique that might improve the image.
I’m referring here to images captured digitally rather than on film. A digital image has a rectangular grid of pixels which are evenly spaced, each with luma/chroma information (in the best case scenario). Stacking a series of similar digital images will allow you to perform statistical analysis and improve the clarity of the image - for example two frames would agree on the color of a pixel and one frame would disagree, and the disagreeing pixel would be erased. However, what if that single pixel was the correct color? To return to the example above with the image of the blue edge: There is almost no chance of any single frame having a correct value for areas close to the edge, because of the blurriness of the dye clouds comprising the image. If there was an errant frame with the correct value, a statistical analysis would eliminate that value because it is not in agreement with the rest. In short, with a digital image, there is no way for an algorithm to reliably determine what is signal vs noise with only a single image, apart from applying a very destructive selective smoothing or sharpening operation.
Film is fundamentally different, in that you can determine the centers of dye clouds with far greater precision than the perceived resolution of the image. The halide crystals are microscopic, so determining where they were is determining precisely where the photons hit the film. There is no way to do this in a digital format. Since we can theoretically identify details with microscopic precision in film, image stacking using only the areas of actual detail will yield a far more impressive result than simply averaging the values of masses of overlapping dye clouds. Here’s how I envision it working:
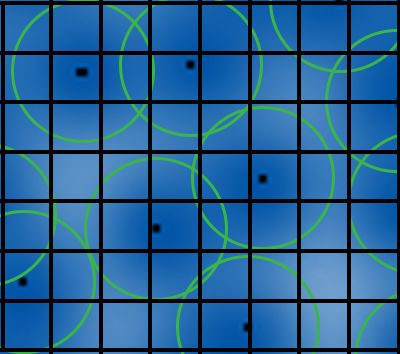
Say that this grid is the output resolution, which is less than the extremely high scanning resolution but still substantially above the resolution of the image. For each blue grain in the image, the center is found. This is where photons have hit the film, and is the only real image information. In this example, there are only about 6 dye cloud centers, meaning that only 6 pixels are assigned values. With enough sources, the entire pixel grid can be filled in. The way this differs from averages or even weighted averages is that only the real information in the image is in the final product. There is no blurriness resulting from interactions between the dye clouds, since the program intelligently uses dye cloud center proximity rather than averages.
And yes, I’d be happy to play around with some high-res images, though I’m no Dr Dre. If a proof of concept were to be made, it would need to be done by someone who knows how to code. I’m the 1% inspiration guy in this case. 😉
You probably don’t recognize me because of the red arm.
Episode 9 Rewrite, The Starlight Project (Released!) and Terminator Ultimatum,
Yeah, if it is captured on digital, then a single image isn’t going to be helped, as every source will be from the digital master.
With prints scanned to film however, I think you end up with the same result, by stacking images correctly, you throw out the noise and are left with the information. With enough samples the chances of only that ‘single’ pixel being correct is basically nil, or at least, less likely to happen than the chances of, for example, incorrectly identifying the centre of a dye cloud.
I’d be interested to see this play out though, I’ll go through my siggraph library to see if anyone is already doing this, there was a lot of research into this kind of thing in the late 90s and early 2000s, there might be something in there. From a programming point of view, it wouldn’t be difficult to implement.
Donations welcome: paypal.me/poit
bitcoin:13QDjXjt7w7BFiQc4Q7wpRGPtYKYchnm8x
Help get The Original Trilogy preserved!
I loaded the scans into elastix to roughly align them, then exported to autostakkert to stack and drizzle the images.
Love this stuff, guys & gals. Keep it coming!
If your crop is water, what, exactly, would you dust your crops with?
Heh:
https://en.m.wikipedia.org/wiki/Drizzle_(image_processing)
And:
https://www.asiaa.sinica.edu.tw/~whwang/gallery/random_notes/drizzle/index.htm
NeverarGreat called it cheesecloth, I called it pepper, and the real name is Drizzle. The kitchen is where it’s at!
If your crop is water, what, exactly, would you dust your crops with?
I’d never heard of Drizzle before. Interesting. The link mentions that the ‘Drizzled’ image has a bit more noise than the original, presumably because every pixel from the original 9 captures is used.
@Poita: I agree that with enough stacked sources, all the prints will be able to agree on an image. Using a simple average, variations in luminosity due to grain disappear. You are left with a very clean image, but it is stuck at the resolution of the average resolution of your prints, at least if you’re only using the same frame from different prints (since these frames will all share the negative grain). But even if you’re using multiple frames in a sequence, there is the potential for detail loss:

Just focus on two pixels of output for a film scan across four frames.
In the first two frames a photon of white light strikes the rightmost pixel. The subsequent dye cloud obliterates the edge, causing the leftmost pixel to become mostly white as well.
In the second two frames a photon of blue light strikes the leftmost pixel. This causes a similar blue blur across the rightmost pixel.
None of these frames is accurate to the original subject, and a simple average of these four frames would arguably be a worse result than simply keeping one frame over another (though on a macro scale the image would be less noisy). If you add another frame to the equation, tipping it in favor of the blue dye cloud, for example, a weighted average would still have a blur caused by this dye cloud. The only way I can see for the program to correctly retain this edge would be for it to measure the dye cloud centers and keep the most accurate parts of each frame. It’s like an intelligent Drizzle for film.
You probably don’t recognize me because of the red arm.
Episode 9 Rewrite, The Starlight Project (Released!) and Terminator Ultimatum,

poita said:
I’ll whip up a quick example for a scene I have multiple prints of.
About that before/after demonstration … S T U N N I N G! I knew of this technique (from motion-compensated temporal “frame stacking” – but with the downside of noticeable temporal “grain crawl” at too-wide a range) but never thought to apply it in your manner (for multiple-source frame stacking). Absolutely stunning.
Even still, the blue layer always seems to be the worst hit …

Would any pre-processing (maybe some temporal stacking) help on the worse layer(s), while not negating the source stacking effectiveness?
.
NeverarGreat said:
In this example, there are only about 6 dye cloud centers, meaning that only 6 pixels are assigned values. With enough sources, the entire pixel grid can be filled in. … I’m the 1% inspiration guy …
That is excellent (and I love your visualizations)! The interesting thing is that this approach also might be useful in things like up-rez via vector reconstruction (must hit the math books for that one) or sharpening via vector calculus boundary redistribution (more math books).
really no one has an answer i don’t mean to be pushy at all i’m really serious. but anyway what about adywans edit of star wars saga? can they use this or the google raiser upscale method to go to “4k” please answer this i’d really really appreciate it.