Great news! I got the OK from NJVC to share his sets on mega again! Harmy has given his approval as well. Go to this thread for more information on and previews of the sets themselves.
But as with anything else Despecialized, these projects should never be bought or sold.
Also you are required to own an own official copies of the Blu-rays or IV-VI of the HD Digital Downloads.
These requirements are to allay concerns of piracy, which could threaten the entire Despecilaized Project. So before you download anything here please obtain official copies of the Original Trilogy in HD. And please … please … DO NOT BUY OR SELL THESE!
I have built in a few barriers I will ask you to deal with before you can get the files to burn the blu-rays. This is not meant to keep anyone who wants copies for personal use from gaining access. Rather, it is meant to ensure that you must be intentional about getting them. I regret that this has to be so convoluted. My aim was to make NJVC’s sets as available as possible, but still make it inconvenient enough to keep my shares from being pirate bait. Follow the steps, be patient, and you will obtain the files you seek, and all without torrents. 😃
I also have a guide to burning these sets posted here below in the most comprehensive a way as I could think of. Mods, if you spot something there that I could improve, please let me know.
Steps for obtaining NJVC Sets
1) Go to https://www.proboards.com/register and set up an account.
2) Now go to http://swesbrotjbrmls.freeforums.net/ and log in with your new credentials.
3) Open the “General Discussion” Folder
4) Click the “NJVC” Subject. This will contain a download link that says “rars”.
5) That link will download a password protected rar file called “NJVC OOT BR MLs”. The page may tell you that there is an error with the preview, but this didn’t interfere with anything when I tested it.
6) Download and extract the file with the password “Speci@lEditionsAre2ShortSighted”. The extracted package will contain a single text file Called “NJVC OOT BR MLs”.
(^Note^- If you do not already have a file extracting program, I used winrar to archive the file, but there many programs that can unrar it for free. Here’s a list of several such programs for windows. The Unarchiver should work for Macs. And here is a helpful article on how to extract archived files in Windows and Mac OS.)
7) This text file will contain links to mega folders for each disc as well as lists of the links you will need for all the individual rar files. The folder links are only provided in case you would like to import them to your own mega.nz account before downloading. It’s probably not feasible to download the entire folder all at once. All these links are in free accounts, which have a 5 Gig transfer limit. That means you’ll probably only be able to download a maximum of 10 files before getting a window telling you to wait several hours before continuing to download.
Also keep in mind there may be a “rush” on these files once I post this, so if you run into bandwidth caps because of that, there isn’t anything I can do.
8) For this reason, I recommend using the download manager “FreeRapid Downloader”. It will let you download several files at once, as well as saving your progress if the process is aborted midway through with the wait message. You can get that here. But you will still likely be limited to 10 files every six hours or so. Remember, patience is key.
For more details on using FreeRapid Downloader, check out Section 4, Steps 1-6 of “The Ultimate Introductory Guide to Harmy’s Star Wars Trilogy Despecialized Editions”, found here.
9) Once you have all the rar files downloaded, extract them with your chosen unarchiving software.
(^Note^- Depending on your extractor and its settings, you will likely need to have free disk space for the rars as well as space in which the ISO files can be reassembled and saved. And these files are massive. The space required for all the rars plus the extracted isos for all three films is close to 450 gigabytes. Make sure you have the disk space necessary before you start. Also, although you will be using the same extraction method as used for extracting the link list, it will be much slower because of the size of the files. Make sure to allow about 30 minutes to an hour for the extraction of each set of rars.)
10) Once the extraction process is complete for each of the rar sets, you will have the following six ISO files:
Star Wars Despecialized 2.7 BD50.iso
Star Wars Documentaries.iso
The Empire Strikes Back Despecialized 2.0 BD50.iso
The Empire Strikes Back - Documentaries BD25.iso
Return of the Jedi Despecialized BD50.iso
ROTJ & SW Trilogy Documentaries BD50.iso(^Note^- ISO files are the digital images of the videos and file structures to be burned to the blu-ray disc, but it is not necessary to burn the ISOs to discs to view them. You can mount the file as a virtual drive to have your computer view the file as if it were a disc in a drive. Here is an article on how to do that in Windows. The process is even simpler in Mac OS. If you still want to burn them to discs, read on.)
11) For the Star Wars and Empire Strikes Back Documentary Discs a 25 gigabyte blu-ray will suffice. For all the others, you will need dual layer 50 gigabyte blu-rays. I recommend Verbatim Brand discs, as they are some of most reliable I’ve used and least likely to end up as coasters.
12) Obtain a blu-ray burner drive.
13) Now that you have the necessary ISOs, blu-ray discs, and blu-ray burning drive you’ll need disc burning software. For this, the best method is to use ImgBurn.
(Edit: But based on continuing feedback, it seems there may still be issues with both ImgBurn’s official download source and more stripped down versions that might seem clean. This is frustrating because I still think ImgBurn is the best way to go about burning these projects. But as such, I’m removing all download links to it from this guide until such time as I can be sure I can point you to a version that I know will not cause users any headaches. In the mean time, ImgBurn is still readily availible, but obtain it at your own risk. I will post a new link in this guide as soon as I can verfy that a copy is completely free of any unwanted software. Stay tuned.)
14) Connect your drive and load the blank disc.
15) You’re ready burn the ISOs to your blu-ray! Follow the steps below.
Steps for burning NJVC Sets
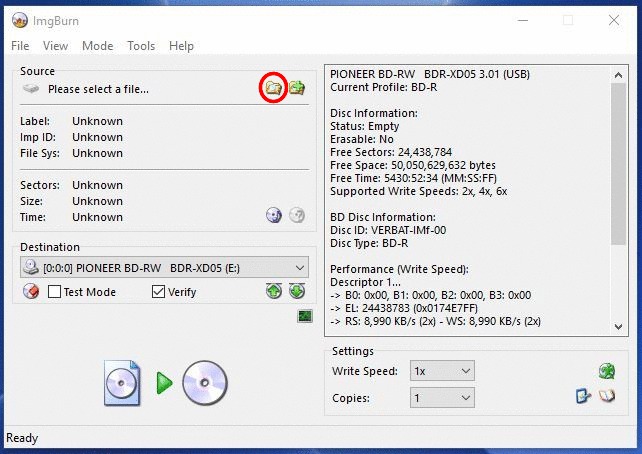
- Open ImgBurn and select “Write image file to disc”.
- Next, Under “Source” use The “Browse for a file…” button to navigate to the ISO you want to burn and select it.
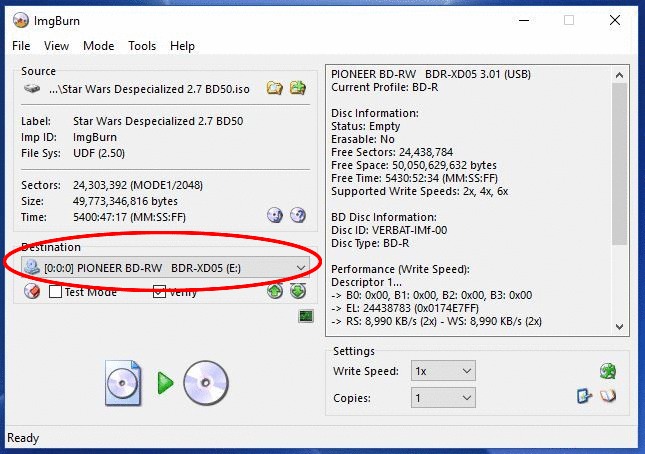
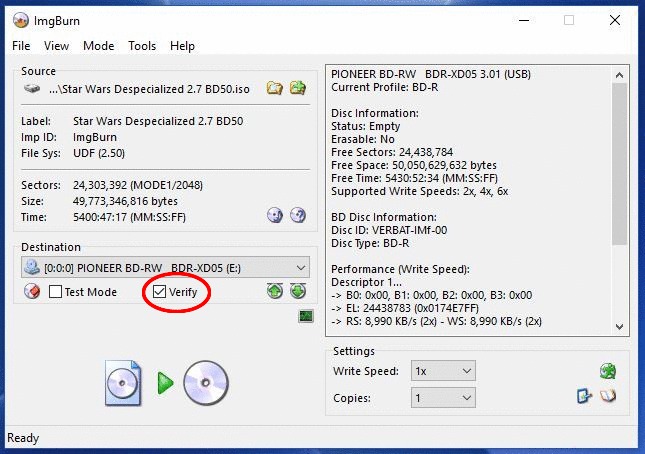
- Under “Destination”, select the blu-ray drive that you will be using to burn the disc.
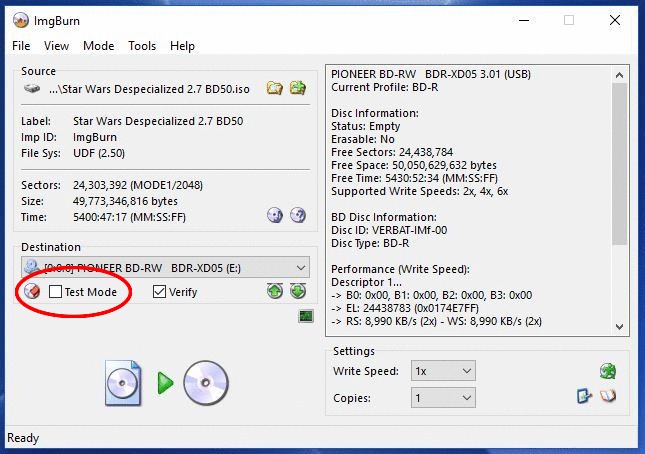
- Make sure the box next to “Test Mode” is unchecked.
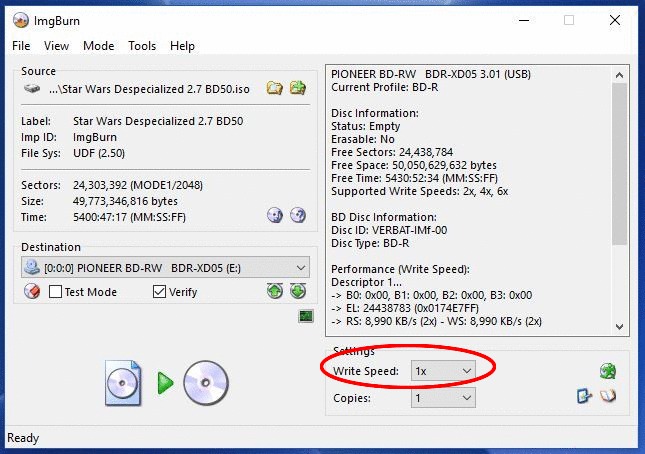
5)* This step is optional, but I strongly recommend it. Set the “Write Speed” to “1x”, the lowest possible setting. This will mean the initial burn will probably take over an hour, but reducing the burn speed means reducing the chances of burning errors.
6)* This step is also optional, but I recommend it as well. Make sure the box next to “Verify” is checked. This will cause the system to scan the disc for errors after the burn is complete. This will add another hour or so onto processing time, but it is a double check so you can be sure the disc has burned properly without any errors.
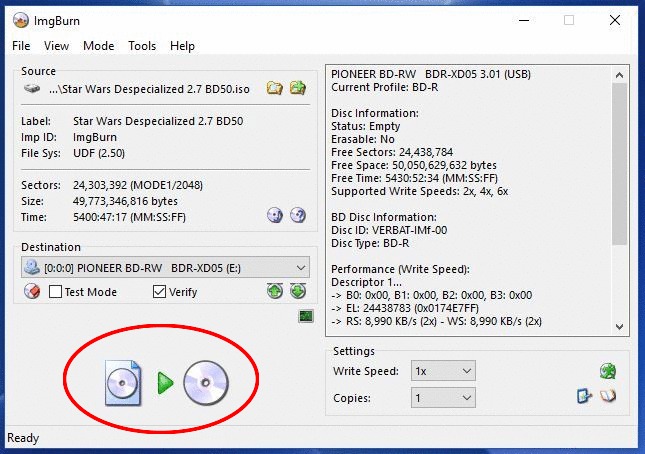
- Click the “Write” button to begin the burning process.
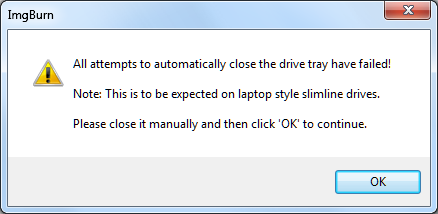
8)* After the initial burn is complete, the disc will eject. If you selected “Verify” in step 6, the computer will attempt to reload the disc to scan it for errors. Motorized trays will allow the computer to do this automatically, but non-motorized drives will not be capable of this. The result will be the following warning message:
This is normal. Reload the disc again manually, then click “OK” as the prompt directs. ImgBurn will scan your disc for errors, probably taking about an hour. When it finds none, it will eject the disc again, announce that the burn has been successful, and you’re done!
This doesn’t work with Jdownloader or unarchiver. Not sure where I went wrong.

Mate, you didn’t really need to quote the whole post by solkap to respond with your post - please remove the quoted section.
Thank you.
dahmage - nice suggestion re http://www.7-zip.org for Windows users. It is free, easy to use, and I found it has fewer issues when extracting files than using winrar or winzip (in my experience, anyway 😃)